Total Pageviews

Thursday, November 1, 2012

Final steps, holiday card making in masses tutorial!

Step 8 involves making sure everything is stuck down tight on the cards, and making sure they are clean and presentable.  No stray marks, no stray scraps, etc..  Step 9 involves adding final embellishment, gems, Stickles, etc..  Anything you want to add to your cards to give them extra sparkle or attention.  Step 10 involves deciding how you are presenting/packaging the cards.

I plan to send some in the mail individually, but also give "packages" as gifts.  To do this, I place 5 similar themed cards (but you could do different themes!) with envelopes inside a close fitting cello bag.  I bought these ages ago at CelloBags.com.  Not sure if they are still around?

I tape the bag shut on the backside, then tie some inexpensive raffia around the pack.  (Michael's)

That's it!  So fun, so easy, so quick (well kind of!  LOL)  Thanks for joining me on this tutorial journey, I hope to do another again in the future!

I'd love to see your cards, hear your ideas, etc., so please share!  :)
  (ps.  in photo above, I stickled the snowman's nose in orange, adding a red gem to the left, and stickled the holly berries in red on his hat)

Thursday, October 25, 2012

Mass production of holiday card project, next steps/tutorial!

Moving right along with this process, of making mass quantities of  hand made holiday cards!  (see prior posts on blog for earlier steps in tutorial).

Today, we are on step 7.  Adding a sentiment.  Now there are many ways you can do this.  You can stamp individual sentiments, use sentiment stickers, (SRM Stickers makes WONDERFUL sticker sentiments for cardmaking!), cut sentiments from patterned paper, use die-cut sentiments, really anything that you like!

For my cards, I used Microsoft Word, chose a font (Georgia) and a size (22) a color (black), and printed a sentiment over and over on white inexpensive cardstock (Sam's Club).  Then I used my Tonic Trimmer, and cute each sentiment in a long strip.  The sentiments are spaced approx. 1" apart on the sheet, so I trimmed them kind of close, just above the sentiment and just below.

Next, I held them up to each individual card, and eyeballed the sizing for the strip.  I cut close near the right end of the sentiment strip (to the sentiment) and on the left side, I cut a bit further away, then made a notched cut in the end for fun!

I adhered these to my cards using adhesive runner (Therm o Web).  And voila, sentiments are added!  Some of my cards don't require sentiments because they were already built into the main image when printed.


I am using a long table and basically grouping my cards in sets of 5, if I give the cards as gifts, I will cello bag up each set of 5.  Also, if I donate cards, I would do the same.  So in each set of 5, I have the same main image, but the paper configuration is a bit different for variety. 

Here are some images of my cards in progress. 


The next steps will involve ensuring everything is adhered nice and tight, adding any extra adhesive necessary, then I will move onto embellishment.  I am keeping it super simple.  I am thinking maybe a gem here and there, maybe some Stickles, just a touch of something fun, but nothing too involved.

I will be doing this soon, and posting some pics.  Then, I will bag some of these into cello bags, including envelopes, and wrapping each bag with raffia. 

Pictures coming!  I'd love to see what you are working on!  Leave me a comment, link, I'd love to hear your ideas, tips, etc.! 

Monday, October 22, 2012

Mass production of holiday cards, next steps tutorial

Moving right along to step 5 of my process (see prior blog posts for prior steps).

After I have matched up cut images with cute papers, I being the assembly process.  First, I fold the kraft cards if that has not already been done.  I take one cute paper to use on the top of the card, and one for the bottom.  The top paper I will cut to 3" by 5 1/4".  The bottom paper I will cut to 1" by 5 1/4".  I will use an ink pad (you don't have to do this step, I just like the added look of ink on my paper edges), such as a dark brown chalk ink, and ink the edges of my patterned papers.

Then using a great adhesive, such as Therm o Web's runner, I attach the larger paper at the top of the card, and the smaller paper at the bottom of the card. 

Step 6 involves adding the "main image" to the card.  I ALWAYS use dimensional adhesive for this step, it really adds to the card's appearance.  I am making cards this year, where some of the main images come with sentiment text, and some do not.  For the images with text built in, I will adhere them to the center of my card front.  For the images without text, I will adhere them to the right side of the card.  (because I will still be adding a sentiment to the left).

Now, you see I am presently making horizontal turned cards (see photo), but I will also be making vertical.  Right now I am telling of the recipe for horizontal.


Please join me back in a few days for more steps in this process.  In the meantime, I'd love to see what you are working on!  Thanks for dropping in!

Wednesday, October 17, 2012

Mass production cardmaking for the holidays, next steps!

Well, this is moving along so well, I am blogging again with the next steps in this process (see last post), before I thought I would!

The first two steps involved making the background cards for this project.

Now, we carry on to the next steps.

Step three involves selecting patterned paper for my project.  I checked at a local craft store, and found some whimsical paper, that is fun for holiday cards.  One paper pad (these are the small pads, I believe they are 6" by 6", but you can buy full sheets of whatever you select, and whatever size you prefer to work with, etc..  If you prefer to have less waste, you might choose bigger paper.  I like having scraps, especially with paper this cute, for my scrap pile, so I don't mind.  But to be most economical, it would be wise to buy the least amount of supply you can get away with.)  is actually holiday themed, the other has polka dots and other patterns which I love.  You may want all your cards to have the same patterned paper, as in a set.  You may want variety in your papers, it's all up to you!

Step four involved finding the main image for the holiday cards.  There are lots of ways to do this.  Here are just some of the ways you can accomplish this.  SRM makes adorable holiday themed image stickers.  You can buy wonderful holiday stamps, and stamp your main image, cut, color if you like, etc..  Doodlebug makes cute dimensional stickers that would be neat to use, you can buy digital images online, and edit them as you see fit (size and color) then print and cut.  You can use machines like the Cricut or Cameo to get beautiful die-cuts, even print and cuts.  You can buy adorable full sheets of patterned paper with holiday images, and cut from the sheet the images to use.  You can buy packs of diecuts.  There are many more ways too.  Yes, some are more time consuming than others.  But it's a labor of love, right? 

So, here's what I've done.  Years ago, I bought a software package from Lasting Impressions.  Do you remember them?  They had adorable papers, brass stencils, etc..  This software is very much like using digital images.  You open the program, and can size and color the images you select to fit your project.  I think other companies might have software like this now, perhaps Stampin' Up?  But digital images you buy online (or even get for free!) work the same way.  But....if you are planning to sell these cards you are making, you NEED to make sure that it is ok with the manufacturer of the images that you do so!

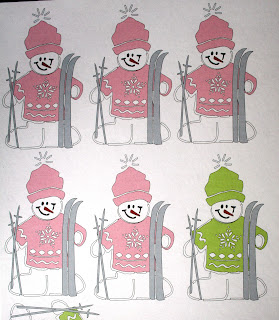
You load the image onto your screen, color it and size it, then duplicate it, or select other images, and print out whole sheets of images onto cardstock (I've used inexpensive white cardstock from Sam's Club).  Then, you cut the images out.  (Yes, time consuming, but I love to fussy cut!)  Here's a picture of one of the full sheets I have printed.  I colored my images to match my patterned paper. 

Next I begin to cut the images.  I always cut around the images, using scissors that work well (important!), and I always leave a thin white border around each image.  I really feel this makes for a polished effect.


I cut the images off the sheet, leaving lots of white space around them.  They are easier to work with this way, then I proceed to cut each and leave the thin border.  Here is a stack of some I have finished cutting, some in progress, and some still on the sheet.

Next, I am going to start placing images with papers that I think make a cute pairing..Here is a photo of this step in progress. 


So, you can see this stage of the project will take me some time to finish.  I will be back in a couple/few days to check in and report where I am at, and see where you are!  Thanks for stopping in!  Please feel free to ask me any questions below, and I'd love to hear your ideas too!

Tuesday, October 16, 2012

It's that time of year, mass production of holiday cards!

Are you interested in making your own holiday cards this year?  Would you like to make card packages as holiday gifts for friends, family, teachers?  Would you like to sell your cards at a small craft show/vendor fair?

I am going to go through here, a step by step process or recipe, I follow for making large quantities of cards.  I'd love to have you follow along!  (also, I'd love to hear your tips, ideas on this topic, and of course see your cards!)  (This is my process, my system, don't feel locked into it, use what works for you!  I have just found over the years, this approach works for me.  :)

My recipe will include, background cardstock for the actual card, patterned papers for the front of the card, a cute holiday image for the front of the card, a sentiment for the front of the card, and some misc. embellishments.  My recipe will include making cards in the standard "invitation" size, that is 5 1/2" by 4 1/4".

My first step, is to decide on what type/color of cardstock to use for making the actual background card.  This time around, I have decided on Kraft colored cardstock, that I picked up inexpensively in a package of 50 sheets at my local Michael's store. 

My second step is to prepare the cardstock, for use in cardmaking.  First, I trim the paper.  I place it on my Tonic trimmer, and cut the 8 1/2" by 11" sheets I have purchased in half.  That is, I cut the paper in half at the 5 1/2" mark, so I end up with two pieces of cardstock, from every 8 1/2" by 11" sheet I use.  I continue cutting until I have cut the entire pack this way.  Yeah, it's not huge excitement, but is easy to do while watching tv, waiting for you child to come out of school, etc.. 


My next step is to get the smaller pieces folded in two, in the shape of a card.  I accomplish this best by using my Martha Stewart scoring board.  I have tried other methods over the years, but I find this easiest and most productive.  I score each of the cards at the 4 1/4" mark.  Yes, I do each and every card, until they are all complete.


Next step, fold along the crease line, and voila!  You now have 100 card bases to begin decorating! 

I will post again in a few days with the next step(s).  The work above will take some time, so join me, and get started!  I'd love to see your final project!  Thanks for stopping by!

Tuesday, October 9, 2012

Had such a blast on WCMD!

I spent time crafting, wow, that felt great!  I love being part of the crafting community.  On Facebook, there was a link set up for crafters to share on WCMD, what a great time!  I made several cards that day, some are for guest designer spots so I cannot share here now, but I did make this card that I can share. 

Its creation involved stamping, coloring with the watercolor marker technique, and using lovely paper product from one of my FAV!! companies, Doodlebug!  Anyone who knows me well knows I have a secret stash of Doodlebug that I have had since the beginning of time!  I am a long time LOVER of Doodlebug!

At the recent CHA show, I visited the Doodlebug booth, it was amazing!  So colorful, so inspiring, just like the Doodlebug line!  If you are not familiar with Doodlebug (how can that be??!!), you've got to check it out!  Every single thing that company makes is adorable!!

So, here's my card, thanks for looking, thanks for stopping by!

Friday, October 5, 2012

Taking Stock of the Crafty :)

I love crafting.  It's so much a part of who I am.  It's so relaxing and rewarding.  Over the years, I have made several projects that have really been special to me.  From my stockpile, here are some of my past favorites.

The top two images I created digitally, the cow card was a party invite for my little one who loves cows, the thank you card and birthday card were published in Paper Crafts Magazine.  I love the graphic look and feel of these items!  The third image was also in Paper Crafts Magazine, and I love it because it's all girly, and includes sparkly, fun glitter!  The fourth image was so fun to create, and includes my baby Felix who is no longer with us.  This scrapbook layout was published in Creating Keepsakes Magazine.  The next photo is a holiday layout which was published in Better Homes and Gardens Scrapbooks, Etc. Magazine.  I love this image because it includes both of my sweet daughters. 

The next image is a mini scrapbook I created for my older daughter.  I love making smaller version scrapbooks, they are so easy to store!  The next layout includes my hubby and little one, and it was in Memory Makers Books.  The small round scrapbook image that is next was also in MMB.  I love it's fun circular shape!  The next Halloween image is a layout I did of my daughter using lovely SRM Stickers and Teresa Collins product.  And finally, a recent card I created using a Lawn Fawn stamp and markers and the super fun watercoloring technique!  I love how this one got me to step out of a crafty box! 

Thanks for looking! 


Friday, August 17, 2012

Made a card last night, fun!

Using My Mind's Eye "Happy Day", my PaperTrey die and stamp set "Warm Happiness Too", my Therm o Web Adhesives, my Spellbinders, some twine, ink, EK Success punch, Stickles, cardstock and OF COURSE SRM product, this is one of SRM's adorable new Valentine borders, I created a card last night!  How relaxing and fun! 

What are you working on?  I am turning my crafty back on now that the kids are in school.  Can't wait to use some products that have been sitting on my craft table in a very lonely fashion.  I'd love to see your projects! 

Last year I did card sketch challenges here, then tried to do a card a day.  I think everyone is so busy, sometimes it's hard to keep up with challenges.  So, I think I am informally challenging myself to create as much as I can, in good balance with my life right now.  That works!  No pressure, all fun!

Thanks for dropping by!  Happy crafting!

Tuesday, August 14, 2012

School starts this week! Hello crafty time!

With two girls back in school, crafty time is coming!  Looking forward to being able to craft!  Also looking forward to joining some boards, some challenges, and other fun!  Hope to see you around cyber/crafty land!  Thanks for stopping by!

Tuesday, July 24, 2012

So grateful to help SRM at CHA!

What a great experience to help SRM Stickers at the recent CHA show!  Thanks to Susan of SRM!

Sunday, July 22, 2012

CHA, so wonderful!

Thanks to the lovely Susan at SRM, I was able to attend CHA Chicago recently!  I loved meeting Susan, John and Laura with SRM!  I also visited many other company booths, and adored their products!  I was very lucky to obtain some new product samples!  Here are some new projects I created using new CHA product from Lawn Fawn!  Isn't the product wonderful!  LOVE Lawn Fawn!  Thanks for looking!

Friday, July 6, 2012

So relaxing, made two cards last night!


Just what the doctor ordered!  Ha!  It felt so relaxing to sneak away and make two cards last night!  I used the stamping and watercolor painting/marker technique, so, so fun!  Love the colors and results!  Here are the cards I made, I'd love to see what you are up to!  I used several products on these cards, Hampton Art Stamps, Memento Ink, Teresa Collins rhinestones, SRM Stickers, My Mind's Eye paper, Tombow markers with water, Maya Road trim, and Therm o Web adhesive.  Thanks for looking and stopping by!

Monday, July 2, 2012

Cards submitted!

Not as many as I would have liked, but I LOVED the cards I submitted!  They are so me!  They are hybrid, and I seriously forgot how much I enjoyed creating hybrid cards!  Thanks Paper Crafts for giving me a "kick" to create! 

Did you get any cards in?  I did the birthday category, although I had a sketch worked up and a photo card too.  But they just didn't turn out in a way that made me pleased.  So, scrapped they were! 

What categories did you complete?  Best of luck if you submitted!  Stay cool, and stay crafty!  :)

Thursday, June 21, 2012

Too fun, making cards for the new PC Call!

 Are you making cards for the new PC Call?  This one is so me!  LOVE it!  I have so many ideas rattling around in this brain!  There is still LOTS of time left on this one, so get a craftin'!  Best of luck to everyone!


Thursday, May 31, 2012

Cardmaking tonight~

While waiting for my daughter tonight, I was able to make 4 cards!  It was so relaxing and fun!  They all use SRM Stickers (LOVE!), and most have Webster's Pages product as well.  Some additional product was used, Therm o Web adhesive, We R Memory Keepers patterned paper, American Crafts ribbon and Thickers, etc...thanks for looking!  And link me up to what you're working on, I'd love to see! 

Wednesday, May 9, 2012

yay! two cards completed!


I have decided that even when I do not feel creative, I still need to find time to craft.  It really helps me in the long run, it is a great stress releasing exercise, and an "escape".  It helps clear my mind, and aids me in refocusing.  So here's to crafting, and working HARD to find time to do it!  I made these two cards this week, and it was FUN!  As always, love the SRM!  Thanks for looking, thanks for dropping by, and link me to your creations!  I'd love to see!  :) 

Monday, May 7, 2012

Crafting tomorrow!

Yes, I'm pretty excited, it's been waaaay too long!  Meeting my great friend Tara, and working on some cards, while our girls are doing schoolwork!  I need two fresh birthday cards, so that's where I'll start!  What's new, and what crafty projects are you working on?  Thanks for dropping by!

Thursday, April 5, 2012

Had a great time at the Tim Holtz Tag Workshop at Archivers!

This week I went to the TH Tag Workshop, it was so fun!  I loved experimenting with his products, especially his new set of markers.  The workshop was paced so well, and at the end, we were given a box of ribbons and accents to add to our tags as we desired.  It really felt wonderful to do some crafting!  Here's what I made, thanks for looking!  The lighting in my house did not do Tim's colors justice.  They are so lovely and vibrant! 

What are you working on?  I am hoping to get down to my craft room some day soon to work on anything!  Thanks for stopping by, Happy Easter!

Friday, March 16, 2012

So much to get done!

Took my photos for photo cards, now need to run them thru Photoshop, and create the final card and basket product.   Also need to get the smaller, easy basket going.  Picked up super cute crafty supplies this week, can't wait to give them a whirl!  It's Friday!  Have a great one!

Saturday, March 10, 2012

Feel like crafting!

I have more gift baskets that I want to make.  One will be so quick and easy, I just don't have all the elements yet.  The other requires some photography work on my part.  Today could be the day to work on the photos....maybe.  For a previous fundraiser, I made photo cards of the institution that the fundraiser was for.  That's kinda sorta my plan this go around.  Stay tuned....  thanks for dropping in, have a GREAT weekend!

Thursday, March 8, 2012

More crafty goin' on!

So here's my finished basket for the fundraiser auction, had to remember how to do the cello, haven't done it in ages!!  But after two tries, got it right!  Thanks for looking!

Wednesday, March 7, 2012

Been doin' a bit o' craftin'

Using October Afternoon's gorgeous papers, cardstock, ink, some embellishments, and of course SRM Stickers, I completed a 15 card set that I am placing into an auction fundraiser, along with some coordinating floral pens I put together.  The cards are shabby chic style, they will be placed into a basket with envelopes and cello covering.  I will post the basket when assembled.  Toying with the idea of making a second basket, had so much fun making this first one!  Thanks for stopping by, thanks for looking!

Saturday, February 4, 2012

Have you seen Scrap and Stamp Arts Magazine's special issue?

It's called "All Occasions!" and it's brand new!  Lots of great ideas inside!  And so excited to report, I have a card using SRM Stickers (LOVE!) on page 55/56!

Tuesday, January 31, 2012

Today's my last day on the SRM Design Team

What a wonderful experience to have been on this team!  Susan, Jenyfur and the entire team were just so awesome to work with!  I am sad my one year term is up!  Time really flew!  But SRM has a whole new crop of amazing designers, so check them out!  And of course, SRM has wonderful new product to inspire you!  Miss everyone already!  xoxoxo,ct

Tuesday, January 17, 2012

LOVE SRM's new product line! Party in a Bag!


What a treat to receive samples of the new product line from SRM!  I paired the SRM with Teresa Collins' Celebrate line, (what a perfect combo.!) and made the following party!!  SRM's Blog, go check it out!     Thanks for looking, thanks for dropping in!  Can't wait to create more projects using new SRM!

Saturday, January 7, 2012

Crafty weekend?

Anyone up for crafting this weekend?  I did a bit this week, some submissions to magazines, and I took a class at Archivers on mini Valentine's Day cards, too fun! 

I have a few cards I might like to put together this weekend, if possible. 

I am so excited, I am receiving a Cameo Silhouette for my birthday!  Then I will just have to learn to use it!  So many people up here are buzzing about the CS, I am just so excited to try it! 

I'd love to see/hear what you are up to in the crafty world!  Hope you have a great weekend!