Well, this is moving along so well, I am blogging again with the next steps in this process (see last post), before I thought I would!
The first two steps involved making the background cards for this project.
Now, we carry on to the next steps.
Step three involves selecting patterned paper for my project. I checked at a local craft store, and found some whimsical paper, that is fun for holiday cards. One paper pad (these are the small pads, I believe they are 6" by 6", but you can buy full sheets of whatever you select, and whatever size you prefer to work with, etc.. If you prefer to have less waste, you might choose bigger paper. I like having scraps, especially with paper this cute, for my scrap pile, so I don't mind. But to be most economical, it would be wise to buy the least amount of supply you can get away with.) is actually holiday themed, the other has polka dots and other patterns which I love. You may want all your cards to have the same patterned paper, as in a set. You may want variety in your papers, it's all up to you!
Step four involved finding the main image for the holiday cards. There are lots of ways to do this. Here are just some of the ways you can accomplish this. SRM makes adorable holiday themed image stickers. You can buy wonderful holiday stamps, and stamp your main image, cut, color if you like, etc.. Doodlebug makes cute dimensional stickers that would be neat to use, you can buy digital images online, and edit them as you see fit (size and color) then print and cut. You can use machines like the Cricut or Cameo to get beautiful die-cuts, even print and cuts. You can buy adorable full sheets of patterned paper with holiday images, and cut from the sheet the images to use. You can buy packs of diecuts. There are many more ways too. Yes, some are more time consuming than others. But it's a labor of love, right?
So, here's what I've done. Years ago, I bought a software package from Lasting Impressions. Do you remember them? They had adorable papers, brass stencils, etc.. This software is very much like using digital images. You open the program, and can size and color the images you select to fit your project. I think other companies might have software like this now, perhaps Stampin' Up? But digital images you buy online (or even get for free!) work the same way. But....if you are planning to sell these cards you are making, you NEED to make sure that it is ok with the manufacturer of the images that you do so!
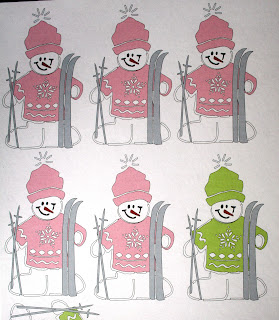
You load the image onto your screen, color it and size it, then duplicate it, or select other images, and print out whole sheets of images onto cardstock (I've used inexpensive white cardstock from Sam's Club). Then, you cut the images out. (Yes, time consuming, but I love to fussy cut!) Here's a picture of one of the full sheets I have printed. I colored my images to match my patterned paper.
Next I begin to cut the images. I always cut around the images, using scissors that work well (important!), and I always leave a thin white border around each image. I really feel this makes for a polished effect.
I cut the images off the sheet, leaving lots of white space around them. They are easier to work with this way, then I proceed to cut each and leave the thin border. Here is a stack of some I have finished cutting, some in progress, and some still on the sheet.
Next, I am going to start placing images with papers that I think make a cute pairing..Here is a photo of this step in progress.
So, you can see this stage of the project will take me some time to finish. I will be back in a couple/few days to check in and report where I am at, and see where you are! Thanks for stopping in! Please feel free to ask me any questions below, and I'd love to hear your ideas too!


No comments:
Post a Comment